[更新于 2022-8-8 23:28:32]
引言
好久没写过博客了,最近又看了一下自己博客的网站,忽然涌上了换个主题的心思。之前的博客是基于hexo的,于是翻找了一些hexo的主题,像hexo-theme-next、hexo主题库也都看了一下,它们都很棒,也都很精致。
但我想要的不是它们,因为在使用hexo中遇到过一些痛点:
- 某些文章不上传。比如你还没写完,不希望这篇文章上传,就只能写之前放在
_drafts里,写完后再放在_posts里面;又如想把某几篇文章下线,把这些文章移出文件夹又显得多余了。 - 隐藏某些文章。可以通过url访问,但标签和全部列表里都不展示,我个人是希望有一个
show:boolean的标签在markdown文档顶部来控制的,虽然最终也能够找到hexo的某个插件来实现这一点,但还是感觉很麻烦。 - 希望把技术文章和生活文章分开。之前为了实现这一点,我用了非常扭曲的方法,以不同的文件夹分别构建网页,大概意思是…我有两个博客,虽然粗糙实现了这一点,但生活文章…依旧从没写过hhh…
于是想要一个基于react、允许自由定制的博客,接着搜索引擎告诉了我答案,找到了一个非常棒的个人博客,还有着简单的教程,https://ssshooter.com/tag/gatsby/。
本文参考此博客的部分搭建步骤,搭建简单的静态博客。最终结果见此博客。
gatsby
顾名思义,它一定很了不起。
盖茨比是一个基于 React 的开源网站构建框架。它在构建个人博客,公司主页,产品落地页方面表现优异。
起步
本博客使用 gatsby-starter-blog 为模板,它预装了一些有用的插件并且拥有着开箱即用的体验。
(因为 gatsby-starter-blog 还在不断更新,可能本文已经过时,在此提醒)
- install Gatsby Cli
见 https://www.gatsbyjs.com/docs/tutorial/part-0/#gatsby-cli
npm install -g gatsby-cli- 参考上面提到的模板的步骤,完成最初的项目搭建,启动项目
在上述步骤完成后,你就有了一个最基础的网站,是的,你可以开始写 markdown 了。 但这还不够…
主要工作原理解析
gatsby 的数据是通过 graphql 拿到的,在你本地启动 Gatsby 服务时,也会启动一个 graphql 的服务。
你的文件,图片等所有资源会被 gatsby 和一些安装的插件解析到 graphql 的节点上,通过一些特定的语法,你可以按需拿到你的资源数据。
而 gatsby 也是这样,通过 graphql 的 api,和你指定的语法完成数据的按需获取,再用获取到的数据渲染成静态网页。
比如 markdown 文件会被 gatsby-plugin-remark 文件解析成 markdownRemark 的节点,摘要会被解析到节点的 excerpt 属性上,一些格式会被解析到 frontmatter 上。
---
title: Hello World
date: "2015-05-01T22:12:03.284Z"
description: "Hello World"
---
This is my first post on my new fake blog! How exciting!
I'm sure I'll write a lot more interesting things in the future.
Oh, and here's a great quote from this Wikipedia on
比如上面的 markdown 文本,会被解析成下面的数据。
{
  "markdownRemark": {
    "excerpt": "This is my first post on my new fake blog! How exciting! I’m sure I’ll write a lot more interesting things in the future. Oh, and here’s a…",
    "excerptAst": "摘要对应的语法树结构"
    "frontmatter": {
      "title": "Hello World",
      "description": "Hello World",
      "date": "2015-05-01T22:12:03.284Z"
    },
    "html": "<p>This is my first post on my new fake blog! How exciting!</p>\n<p>I’m sure I’ll write a lot more interesting things in the future.</p>\n<p>Oh, and here’s a great quote from this Wikipedia on ...",
    "htmlAst": "html 对应的语法树结构"
  }
}
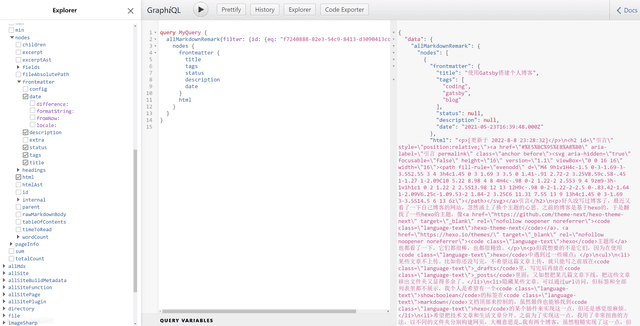
因此需要了解 graphql 的部分语法,在 Gatsby 本地启动时,会在同端口的 /__graphql 路径上启动 graphql 服务,通过该服务我们可以轻松获取所需的数据结构,见下图:

下面我们先简单介绍下 gatsby-node.js 文件:
gatsby-node.js
exports.onCreateNode = ({ node, actions, getNode }) => {
  const { createNodeField } = actions

  if (node.internal.type === `MarkdownRemark`) {
    const value = createFilePath({ node, getNode })

    createNodeField({
      name: `slug`,
      node,
      value,
    })
  }
}
在 onCreateNode 这个 hook 中,做了这样的事情,在 Markdown 节点创建时,拿到对应的 path,并把 path 的值以名称 slug 挂载到节点的 fields 里。
接着我们就可以看在 createPages 这个 hook 里有这样一个 graphql 语句:
// Get all markdown blog posts sorted by date
const result = await graphql(
  `
    {
      allMarkdownRemark(
        sort: { fields: [frontmatter___date], order: ASC }
        limit: 1000
      ) {
        nodes {
          id
          fields {
            slug
          }
        }
      }
    }
  `
)
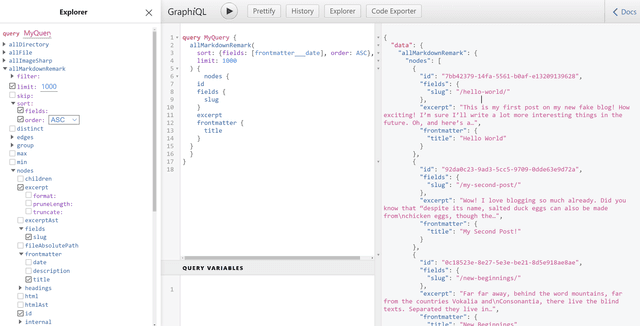
它的作用不难看出来,以 frontmatter 的 date 为增序排列,列出所有的(前 1000 个) markdownRemark 节点,同时拿到节点数据里的 fields 里的 slug 数据。
我们可以去 http://localhost:8000/___graphql 里看一下实际获取的数据,见下图:

那下面的 createPages 实际的作用也不难理解了,通过给定的 url 去创建一个页面
const posts = result.data.allMarkdownRemark.nodes

// Create blog posts pages
// But only if there's at least one markdown file found at "content/blog" (defined in gatsby-config.js)
// `context` is available in the template as a prop and as a variable in GraphQL

if (posts.length > 0) {
  posts.forEach((post, index) => {
    const previousPostId = index === 0 ? null : posts[index - 1].id
    const nextPostId = index === posts.length - 1 ? null : posts[index + 1].id

    createPage({
      path: post.fields.slug,
      component: blogPost,
      context: {
        id: post.id,
        previousPostId,
        nextPostId,
      },
    })
  })
}
拿到所有的 markdown 文件数据,给每一个 markdown 文件创建一个对应的 url 页面,页面对应的组件是 blogPost,传入这个组件的 context 变量,可以在组件内部通过参数 pageContext 获取,同时也作为参数传给组件对应的 graphql 语句。
blog-post.js
在 blog-post 文件里,就是将传入的数据渲染成页面的部分了。
下面我们来看 blog-post.js 的实际代码:
export const pageQuery = graphql`
  query BlogPostBySlug(
    $id: String!
    $previousPostId: String
    $nextPostId: String
  ) {
    site {
      siteMetadata {
        title
      }
    }
    markdownRemark(id: { eq: $id }) {
      id
      excerpt(pruneLength: 160)
      html
      frontmatter {
        title
        date(formatString: "MMMM DD, YYYY")
        description
      }
    }
    previous: markdownRemark(id: { eq: $previousPostId }) {
      fields {
        slug
      }
      frontmatter {
        title
      }
    }
    next: markdownRemark(id: { eq: $nextPostId }) {
      fields {
        slug
      }
      frontmatter {
        title
      }
    }
  }
`
上面这个 query 拿到的数据也不难理解,通过传入的 id, previousPostId, nextPostId, 来分别拿到 当前文章,上一篇,下一篇的数据,同时这些拿到的数据会以通过 data 来渲染实际组件
const BlogPostTemplate = ({
  data: { previous, next, site, markdownRemark: post },
  location,
}) => {
  const siteTitle = site.siteMetadata?.title || `Title`
  ...
  return <div>
    <header>
      <h1 itemProp="headline">{post.frontmatter.title}</h1>
      <p>{post.frontmatter.date}</p>
    </header>
    <section
      dangerouslySetInnerHTML={{ __html: post.html }}
      itemProp="articleBody"
    />
    <nav>
      <li>
        <Link to={previous.fields.slug} rel="prev">
          ← {previous.frontmatter.title}
        </Link>
      </li>
      <li>
        {next && (
          <Link to={next.fields.slug} rel="next">
            {next.frontmatter.title} →
          </Link>
        )}
      </li>
    </nav>
  </div>
}
上面提到的如何渲染组件就更不难理解了。
简单分页
理解了功能如何运转,那么新增功能就比较容易了,比如做一个翻页功能,每一页展示 7 篇文章。
// 修改 gatsby-node.js#exports.createPages
  const postsPerPage = 7;
  const pageCount = Math.ceil(posts.length / postsPerPage);
  Array.from({ length: pageCount }).forEach((_, i) => {
    createPage({
      path: i === 0 ? `/blog` : `/blog/${i + 1}`,
      component: path.resolve("./src/templates/blog-page.js"),
      context: {
        currentPage: i + 1,
        totalPage: pageCount,
        limit: postsPerPage,
        skip: i * postsPerPage,
      },
    });
  });
// 新增 ./src/templates/blog-page.js, 以下仅做参考
const BlogPage = ({
data,
location,
pageContext,
}) => {
const posts = data.allMarkdownRemark.nodes;
const { totalPage, currentPage } = pageContext;
return (
<Layout location={location} siteTitle={data.site.siteMetadata.title}>
<ul>
{posts.map((post) => {
const title = post.frontmatter.title || post.fields.slug;
const tags = post.frontmatter.tags;
return (
<li key={post.fields.slug}>
<article
className="post-list-item"
itemScope
itemType="http://schema.org/Article"
>
<header className="pb-2">
<h3 className="truncate my-2">
<Link to={post.fields.slug} itemProp="url">
<span itemProp="headline" className="hover:underline">
{title}
</span>
</Link>
</h3>
</header>
<section>
<p
dangerouslySetInnerHTML={{
__html: post.excerpt,
}}
itemProp="description"
/>
</section>
</article>
</li>
);
})}
</ul>
<div className="hover:underline">
{currentPage - 1 > 0 && (
<Link
to={'/blog/' + (currentPage - 1 === 1 ? "" : currentPage - 1)}
rel="prev"
>
← 上一页
</Link>
)}
</div>
<div className="hover:underline">
{currentPage + 1 <= totalPage && (
<Link to={'/blog/' + (currentPage + 1)} rel="next">
下一页 →
</Link>
)}
</div>
</Layout>
);
};
export const Head = ({ pageContext }) => {
const { currentPage } = pageContext;
return (
<Seo
title={`全部文章` + (currentPage === 1 ? "" : ` 第${currentPage}页`)}
description={`全部文章列表`}
/>
);
};
export const pageQuery = graphql`
query BlogPage($skip: Int!, $limit: Int!) {
site {
siteMetadata {
title
description
}
}
allMarkdownRemark(
sort: { fields: [frontmatter___date], order: DESC }
limit: $limit
skip: $skip
) {
nodes {
excerpt
fields {
slug
}
frontmatter {
date(formatString: "YYYY-MM-DD")
title
description
}
}
}
}
`;那么一个简单的分页就完成了,/blog/ 路由是第一页,/blog/2 路由是第二页
自定义样式
我的博客主要使用的样式工具是 tailwindcss 和 styed-components。 一些简单的样式通过 tailwindcss 完成,轻松愉悦;一些相对复杂的样式通过 styled-components 实现,自由灵活。
tailwindcss 安装:Install Tailwind CSS with Gatsby
styled-components 安装:gatsby-plugin-styled-components
字体的话,本博客使用的是 汉仪文黑(个人非商用),如需商用请注意字体版权。
字体压缩的话请看这篇博客,对中文字体进行压缩
在更新 gatsby 到 v4 时倒是遇到了一个问题,因为配置了 graphQl 的 typegen, 自动生成类型文件,同时 tailwindcss 会扫描这个目录下的文件导致重新生成而导致死循环了。解决方案见下:
gatsby:https://www.gatsbyjs.com/docs/how-to/styling/tailwind-css/
tailwindcss: https://tailwindcss.com/docs/content-configuration#styles-rebuild-in-an-infinite-loop
如本网站的一些效果实现,正常情况下通过 web 开发者工具就能拿到了,如果需要获取源码的话,请联系本页面底部邮箱。
其他处理
当然,在整个页面搭建中,还有一些别的处理:
某些文章不上传
在用 graphQl 查询文章时,设置相关的过滤条件即可
---
title: 被忽略的文章
date: 2021-5-23 16:39:48
status: ignore
---
比如下面的 filter,如果 markdown 顶部 status 为 ignore 或者 hide 就会忽略
export const pageQuery = graphql`
  query BlogPage($skip: Int!, $limit: Int!) {
    site {
      siteMetadata {
        title
        description
      }
    }
    allMarkdown(
      sort: { fields: [frontmatter___date], order: DESC }
      filter: { frontmatter: { status: { nin: ["ignore", "hide"] } } }
      limit: $limit
      skip: $skip
    ) {
      nodes {
        excerpt
        fields {
          slug
        }
        frontmatter {
          date(formatString: "YYYY-MM-DD")
          title
          tags
          description
        }
      }
    }
  }
`;
同时在 createPages 时,只忽略 status 为 ignore 的文章,这样的话 status 为 hide 的文章可以通过 url 来访问,而不能在页面中找到它。
MDX 处理
mdx 文档,即允许在 markdown 文档里使用 jsx 的组件来渲染的文档。在 gatsby 中,我们可以通过官方的插件 gatsby-plugin-mdx 来获取 mdx 格式支持。
像链接导航这个页面,目前就是通过 mdx 来渲染的。其中卡片链接就是通过下面的文档内容来渲染出来的。
<LinkCard
  imgSrc="https://zh.javascript.info/img/favicon/favicon.png"
  href="https://zh.javascript.info"
  title="现代 JavaScript 教程"
  description="通过简单但足够详细的内容,为你讲解从基础到高阶的 JavaScript 相关知识。"
/>
在 gatsby 中 mdx 的数据结构其实是和 markdown 不太一样的,比如 markdown,如果使用 remark 来处理会生成 markdowmRemark 节点,而如果使用 mdx 来处理,会生成 mdx 节点。

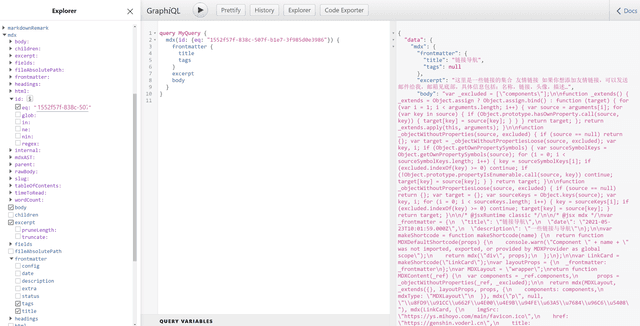
markdownRemark 节点通过 html 属性可以直接拿到 html 文本,而 mdx 则需要通过 body 属性拿到 js 文本,再由 MDXRenderer 来渲染成实际的文档。
这两种处理方法,最好在实际使用中只使用一种。如果想用 mdx,最好将 markdown 也由 mdx 来处理,不然的话,graphql 语句可能需要写两套来分别适配 markdown 和 mdx,会徒增烦恼。 同时,目前 gatsby-plugin-mdx 同样也支持 remark 插件。
可能为了实现这一点,gatsby 团队做了不少工作
[笑哭],因为目前 gatsby 其实也只支持 mdx v1 版本,v2 版本还在开发适配中… https://github.com/gatsbyjs/gatsby/discussions/25068
在我的使用中呢,我还是喜欢将 markdown 通过 remark 处理直接生成 html,毕竟这样的话,页面加载更快,加载体积更小,同时可以比较方便地支持 feed 流 RSS 订阅。
但是呢,一些效果,比如上面提到的 LinkCard 实现起来相对麻烦,可能需要写 remark 插件来实现自定义的渲染。如果使用 mdx 的话,实现就比较容易。
所以尽管我计划之后都通过 remark 来处理,但目前还是 remark 和 mdx 混用的。具体方法是按照下面: (有一定风险,不推荐大家使用)
// gatsby-config.js
export const createSchemaCustomization =
  ({ actions }) => {
    const { createTypes } = actions;

    createTypes(`
      type Frontmatter {
        title: String
        description: String
        date: Date @dateformat
        tags: [String]
        status: String
        extra: [String]
      }

      type Fields {
        slug: String
      }

      interface Markdown implements Node {
        id: ID!
        excerpt: String
        frontmatter: Frontmatter
        fields: Fields
      }

      type MarkdownRemark implements Node & Markdown {
        frontmatter: Frontmatter
        fields: Fields
      }

      type Mdx implements Node & Markdown {
        frontmatter: Frontmatter
        fields: Fields
      }
  `);
  };
// blog-post.js
export const pageQuery = graphql`
query BlogPost($id: String!) {
site {
siteMetadata {
title
}
}
markdown(id: { eq: $id }) {
id
excerpt
... on MarkdownRemark {
html
}
... on Mdx {
body
}
frontmatter {
title
date(formatString: "YYYY-MM-DD")
description
tags
extra
config
}
}
}
`;摘要长度
摘要长度,看起来是将文章前多少个字取出来就可以了。 但是实际使用下来你会发现,这个长度很不稳定,全是中文和全是英文长度差距是非常大的。以十个字符为例:
abcde123456
会有清亮的风使草木伏地
这里的解决方法应该有很多:
- 服务端计算字符长度
因为这里我们并不需要获取实际真正的字符长度,仅仅是为了比对标准长度拿到一个合适长度的字符串,应该会有不少库可以达到这个目的。
- 多行文本 ellipsis
如果你的摘要只有一行,那么简单配置下 ellipsis 的样式就可以了;如果有多行,那么仅通过 css 去处理的话可能会有兼容问题,可以通过 ellipsis 的 js 代码库来处理
- 一个中文文字按照两个英文字符处理
这个方法比较简单粗暴,但效果确实还可以,因为比较简单,所以实际上我的博客就是使用的这个方法。
export const createResolvers: GatsbyNode["createResolvers"] = ({
  createResolvers,
}) => {
  // 处理摘要时,将中文按照两个字符长度处理,不然 120 个中文和 120 个英文内容差太多了
  const matchChineseChar =
    /[\u4e00-\u9fa5\u3000-\u301e\ufe10-\ufe19\ufe30-\ufe44\ufe50-\ufe6b\uff01-\uffee]/;
  const excerptLengthLimit = 120;
  function limitExcerpt(excerpt) {
    let len = 0;
    for (let i = 0; i < excerpt.length; i++) {
      if (matchChineseChar.test(excerpt[i])) len += 2;
      else len += 1;
      if (len >= excerptLengthLimit - 1) return excerpt.slice(0, i) + `…`;
    }
    return excerpt;
  }
  const excerpt = {
    type: `String`,
    async resolve(source, args, context, info) {
      const data = await info.originalResolver(
        source,
        {
          truncate: true,
          pruneLength: excerptLengthLimit,
        },
        context
      );
      return limitExcerpt(data);
    },
  };
  const resolvers = {
    MarkdownRemark: {
      excerpt,
    },
    Mdx: {
      excerpt,
    },
  };
  createResolvers(resolvers);
};
图片放大展示
请到本篇阅读:使用 medium-zoom 实现响应式图片的放大展示
结语
感谢看到这里呀,如想寻求部分源代码实现,请联系底部邮箱~